Tuesday, December 6, 2011

Dress up your ceilings!


     Here's a couple of paint ideas to dress up your ceilings. The ceiling is sometimes called the forgotten wall due to all the attention usually goes to the walls.
    If you would like to wake up your ceiling add moldings, color or faux and get instant WOW factor in your interior.
     Keep it simple, choose a color scheme using a few shades of the same color. You can't go wrong!
     The faux rag technique on the wall to the right  is used again on the ceiling surrounded by a beautiful bright white frame. This once timid ceiling is now proud to be dressed up. This is a very simple project that ties in the surrounding area.                                                                                                                 
     On the left this tone on tone faux ceiling has a framed in boarder that adds just the right touch to this kitchen dining area. It's a nice compliment to the crown molding and adds more interest to the room.

     This ceiling has a texture which adds more depth to the rag technique. The total width of the framed boarder is 12 inches and was applied 8 inches from the crown molding. An eggshell finish was used to break up the larger area of the flat white ceiling.
 
     Just by adding some color can change your ceilings from subtle to dramatic with or without moldings.

      Looking up has never been better, use your imagination, plan out your ideas and go for it! Remember it's paint and it can always go back to white. So, Dress up your ceilings!

Tuesday, November 29, 2011

Faux wood garage doors


     There's nothing like the look and feel of real wood with a deep warm stain, it's so elegant. The homeowner decided that the original off white  painted  doors needed to be changed.

     Do we change the doors to real wood which would cost a small fortune or faux them to match our front entry door. Well as you can see they went for the faux wood, great choice!

     Faux wood applied correctly can give the illusion of real wood and feel real to the touch, that's what faux is all about, fool the eye and everything follows. In the picture above I have the sequence of steps which I needed to take to build up the faux wood.

     The first door on the right I used base paint from Benjimen Moore Moreguard exterior latex # 1110. I applied only one coat and painted with a three inch brush going in the direction of the grain.
The doors were originally off white so I let a little of that come threw to add depth. I like to start the grain pattern right away if I can. Starting with a solid base is satisfactory.

     The middle door - I started to apply the first glaze B.M. Mooreguard Charleston Brown in the panels of the door. At this point my brush strokes were going in a horizontal pattern, side to side leaving some of the base showing threw. Each panel needs to have it's own personality so try not to repeat the same pattern.

     Door on the left shows the grain pattern running left to right. Normally the pattern would be horizontal with this door design and the grain would run up and down on the vertical frame pieces. I felt in this situation I would run the grain horizontally. These doors originally had smooth wood and were spray painted unlike the stamped metal doors that have grain running the same way threw out the entire door. I mentioned this because the grain comes out much better with a smooth base. The faux technique for metal doors is much different.

    Finally, the picture below shows a rich warm color and a nice sheen. I used B.M. Mooreguard #2107-10 in glaze. Take special care to apply the grain to each panel first and then the frames. Don't cover your work completely, let the under glazes show threw. Some areas I added straight paint # 2107-10 to create a more defined grain using an artist brush. Keep your grain random, try not to repeat the same pattern.

Click on to enlarge
    Protective finish - After the paint is fully dried I added a little ultramarine blue oil base artist color out of the tube to Exterior Spar varnish to reduce the orange color. To do this on your first coat mix 50/50 spar varnish and mineral spirits plus a dab of blue. Check on a sample board to see if your satisfied with the results. If your happy move forward apply this coat, let dry and then apply 100% exterior spar varnish.

   Now sit back in your driveway and admire your work!


Monday, November 28, 2011

Create an escape!

                              http://s1230.photobucket.com/albums/ee487/arrayofcolorinc/
                                                                Create an escape!

      Best seat in the house! Every day is a sunny day, no sunscreen needed, no books to read, just your imagination. We spend an average of a year and a half in our lifetime in bathrooms. Now that you know this, why not make this room a place you can really enjoy.

     In this bathroom there are painted blue skies, white clouds and clean sand all around. The palm trees swaying in the calm breeze and a small wooden fence we can follow down to the beach. This bathroom is a small room which needed to be opened up and appear larger. The blue sky automatically opens up the room. The white clouds and palm trees give the room a whimsical affect.

     Why not create a place to escape and enjoy the time there. Adding a light blue color to the walls in a small area gives you the illusion of space. Build on this scene by adding clouds. If you’re up for the task add palm trees and the beach. This is your creation; add all the things which bring happiness into your life.

     Use your imagination and don’t be afraid to paint some clouds or trees, its paint and it can be painted over. There are so many projects and techniques which will create a feeling of space and this is just one of them, one you will enjoy!

First Impressions

                             What was your first impression ? ....Exactly !
  
        Home for sale, not today! In the Real estate market today, you need to look over every single aspect of your home to gain an edge on the other guy. There is a  heated competition of homes for sale in your neighborhood. Sometimes the only thing needed is a fresh coat of paint.
 
       Take a look at your interior and exterior and try to be objective as possible, ask yourself, would I buy this home in it's current state. Ask a friend or relative to give there opinion or even your real estate agent, these people will be honest  and are trained to get your home to sell quickly.
  
       The first thing to look at is your curb appeal, does it look like it needs help? Pressure cleaning, painting the walls or maybe the trim is an easy job for the Do it Yourself-er! It may be in your best interest to hire a professional painter if the job is to big for you to handle.
 
       As your walking up to your front entry door what does it look like?  Make a good first impression with a fresh coat of paint on your front entry door. It will work wonders, it may be the only thing needed to sell your home!


Wednesday, November 23, 2011

Do's and Don'ts- Paint Rolling


     I have rolled countless walls in the past 20 yrs. and would like to pass onto you some very good advice . Below is a list of do’s and don’ts for the DIY on how to apply paint with a roller to achieve professional results. Now remember I have many years experience and I’m still actively painting which keeps my craft sharp. If you’re a weekend warrior take your time, have patience and you will be very proud of your work.

    Do, purchase quality tools, lint free roller covers, heavy duty roller handle and
adjustable roller pole, heavy drop cloths. Keep the tools clean after use and you will have them a long time. It is worth the investment.  Don’t purchase cheep kits

    Now assuming the walls have been prepped and cut in you’re ready to roll….Oh! Wait a minute, if the paint your using is a flat finish the procedure is fairly easy. If you’re using a sheened paint there is more care involved. Shiny surfaces show all imperfections. I recommend painting one wall at a time.

    Tape off your base, door frames, window frames and chair rail. Bring your roller as close to these taped off areas as possible.This will help reduce marks left from the cut in and or roller when walls are dry.  Ok! You’re on your own, go for it!

    Do, choose a roller nap which goes with the type of wall texture. ½ inch for smooth surfaces and 3/4inch for slightly textured, 1 inch for heavy texture.
 I recommend purchasing a lint free roller cover.

    Do, roll vertically up and down the wall using slight pressure while moving to the left or right for your next pass.  Don’t roll an “N”or “M” at the start of each pass. Do not stop in the middle of the wall. Don’t roll in different directions.

    Do, use a tray to get the most paint if using a gallon. Use a five gallon bucket if using more than a gallon. Don’t waste paint and time.

    Do, start rolling three quarters of the way up the wall. Don’t start at the very top.
Since the roller is filled with paint there will be no room to spread out. There will be a big blotch of paint dripping down your walls.

    Do, apply an even amount of paint to the roller. The best way to do this is to tap the roller into the paint a little at a time while turning the roller to get an even distribution. Don’t submerge the roller into the paint.

    Do, keep your roller wet at all times. Don’t decide to have lunch and leave the roller out of the paint and expect it in good condition when break time is over.
Keep ceiling fans off so it does not dry the paint in the tray or form a skin.

    Do, keep an even pressure while rolling. Don’t push too hard, this will cause the paint to make thick lines on the wall, we call them ropes. Too little pressure will leave an uneven finish. Try not to stop in the middle of the wall.

    Do, apply paint to the roller after each pass to keep the finish uniform. This will also keep a wet edge on your work. After a couple of passes reroll over the area with only the weight of the roller and a dryer roller ( this is the only time a dryer roller is used ) Roll starting at the top and bring it down to the very bottom. This will smooth out any lines which may have been applied. Don’t let roller get dry while rolling on the paint. This is important when applying paint at each pass.

Do, let paint dry completely and most likely a second coat will have to be applied.
Follow all the above for the second coat.

Note – Some companies have a line of washable flat paints. These products have a low sheen to them which needs more finesse when applying. Follow these rules and you’ll have a better chance of success.


Sunday, October 30, 2011

A Fall Night

Click to enlarge
I painted this picture in 1988. The inspiration to paint the picture came one night while I was in my car waiting for a friend.  I could not believe the brilliant colors of the leaves around the street light. The leaves were glowing in all the surrounding darkness. What a creepy but beautiful contrast. As the leaves fell from the trees, they were caught in the light only to disappear into the night. Without light there is no color. That scene remained in my mind until one night in the fall of 1988, I decided to put it on a canvas. It reminds me of the never ending cycle of the seasons and how the fall goes out in such glory.


How to - paint touch ups

Time for paint
 
     The holidays are right around the corner, family is coming over and you would like to make a good impression. There are a few areas on your home interior walls that need touching up but you cannot find the matching paint, what do you do? Don’t panic! The following techniques will help achieve professional results.

      Take a deep breath and relax, check to see if there is any of the original paint in your supply room. If you can not find the original paint try the next step. Next  take a small sample of the paint color from the wall to the paint center and have it matched. Take a razor knife and score the sheet rock making a square the size of 2 x 2 inch. After cutting into the wall peal the first layer away from the wall. I recommend picking an inconspicuous area, behind a door is a great place to start. If you have found the paint, mix it well and try a test spot on the wall to see if it blends in. If it bends in your ready to proceed.

Clean area
    Spackle the area where the sample was taken, when dry, sand and wipe clean. Now take your newly matched paint and apply it to the areas as needed for touch ups. I found a 4 inch mini roller with a standard ½ in. nap is great for this application. The mini rollers have become very popular and can be found in most paint supply centers. Also, pick up a roller tray and a small tarp to catch any drips. Pour a little amount of paint into the roller tray and then apply paint to the roller. Try not to add too much paint to the roller.

Spot prime
     If you have any spots that have crayons or magic marker I recommend using Cover Stain Primer in a spray can. Read the instructions first and then apply a small amount to the area. When your primer dries you are ready to paint. Clean the other areas as needed.

     I found the roller technique better than using a brush. The brush tends to make a band aid appearance which is very obvious; your walls will appear to have a bad rash. Using the roller tends to blend the paint in much better. Before starting test a spot of paint and use a blow dryer to see how it blends in. If the spot of paint disappears after it dries then you’re good to go.

Apply paint
     Roll over the area that needs the fresh paint and run the path of the roller a least 12 inches on all sides lightly feathering the outer areas. (In this demonstration I used a light color so you can see what I’m explaining better ) Move your roller vertically up and down the wall. This works great for all paints but sheen paints need a little more finesse.


   If you’re touching up an area which is perpendicular to a window using eggshell, satin, semi-gloss finish it will be very noticeable. By using this technique you will have a better chance of the paint blending in. Another tip: There are shadow areas in all rooms which are next to door frames, windows, hanging pictures and furniture; these are great areas to bring your paint towards to hide the new touch up.

Feather all edges


    When the touch up is very close to an adjoining wall move you’re roller towards the wall corner. We are trying to fool the eye and make the touch ups less obvious. It is very important that the paint match is as close as the original paint. The sheen and color needs to be the same for this to be successful.


Nice and clean
   When I find spots at eye level I roll the paint as high as my arm will go and also as low. By doing this the touch up will be hard to find.  Two coats may be required over a primer. Purchase good grade paint and the results will be very nice.

    Note: If you see spots coming threw your finish work reapply the spot primer and when dry touch up the area again. Enjoy your Holiday's!


Monday, October 24, 2011

Is that the color?


      Many times while cutting in a room with a new paint color my customers would ask, is that the color? I kid around with them responding, no, this is your neighbors color and they asked me to try it out on your walls. They said, you would not mind. The look on their face is worth millions. No really, is that the color? They ask again. Yes, it is. What is happening here?

     Any time we are changing a color of a room for example, the walls were originally medium blue changing to yellow. The two colors are now together and the yellow has a greenish look to it. Don’t panic, this is basic color 101. Why is this happening?

     OK, I know most of us are not artist’s and don’t remember color theory, so, if you take a blue  and mix it with yellow you get green. The same goes for blue and red make purple, red and yellow make orange and so on.
    
     This happens when the paint we are applying is a sheen finish such as eggshell, satin, semi - gloss. The reflection picks up the main color in the room, hence changing the color. This affect is temporary; once the entire room is painted the color will look the same as the sample. There’s more….

      Lighting! Choosing colors from a swatch book or fan deck in a room at night the color will not look the same in the daylight. Also, I found that window tint comes in different colors which will greatly change the colors in a room. It is wise to choose a color in the rooms that you would like to have painted in both day and night lighting.
    
     We also suggest large color samples to view in each room which will make your decisions easier. Purchase pints or quarts of paint and paint on construction board. I use a blow dryer to speed up the process and then add another coat of paint. Hang the big samples around your home for a few days and your color choices will narrow down to the best ones.

     Using these large samples enables us to see how color will react in different lighting. We also get the chance to see how it works with the various fabrics in a room.
Remember that a sheen paint finish will pick up colors that are around them. A flat finish would be a better choice if you’re concerned about other colors encroaching.

     Today there are washable flat paints which are not flat; these products have a low sheen to them. Make your samples and see how they will react in your interior, this way there is no surprises. It is worth the extra time to exercise this method.


Sunday, October 23, 2011

Dreams


      How can we resist a glance at blue skies and white clouds passing by our windows. For a moment our minds are floating away and we are lost in a dream. Many of us have imagined great things which have become reality. Your dreams can come true and it may take a lifetime to achieve, so stay on track and keep your eyes on the prize. Success will come in time.

Wednesday, October 19, 2011

The Color Purple


                                                                     The Color Purple
          Mystery, magic and creativity are some of the words often associated with the color purple.

 The storm has passed and the water is still. Clouds cradle the moon as if it was a prized pearl with it's illuminating glow leading us into another day.

Original acrylic paintings created by Ron Markowitz.

Thursday, October 13, 2011

Orange Memories


     I lived in New Jersey for several years and witnessed some of the most awesome displays of the leaves changing color in the Fall. It was like mother nature's fireworks changing with each passing day. Little did I know what a profound effect it would have on my life. 

     In my opinion, orange is the most iconic color of fall. When the trees explode into brilliant colors, we are reminded that fall is here. As we stare at this beautiful color show, we remember the things we loved the most and still cherish today. I remember running door-to-door on Halloween night, collecting delicious candy in my orange pumpkin, glowing jack o’ lanterns greeting me at every door step, and candy corn in my grandmother’s candy dish which I could not keep my hands out of.

     A few more of my orange memories include the smell of hot pumpkin pie fresh out of the oven, sweet potatoes, carrots and don’t forget that beautiful roasted turkey glazed with honey. Many of us had to rake the falling leaves from our yards and sometimes the pile of leaves would be four ft. high. During break time a tall glass of OJ was the perfect refreshing energy drink that put a smile on all our faces.  Once the break was over we would throw our selves into the pile of leaves and roll around till we were dizzy.

      How can anyone resist playing in those piles of leaves?  Sometimes the leaves would lift off the ground and chase each other around in the wind creating a kaleidoscope of color. It’s their last dance before winter arrives.

      No sooner than the trees are bare, we continue the celebration of fall with all the colorful decorations and food in our homes. Family and friends come together to share old stories and enjoy one of the most cherished meals of the year and give thanks.

      Living in Florida there are few natural reminders of fall. This is why color plays such an important role in our lives. I welcome all the warmth and vitality of the color orange. 

Monday, October 10, 2011

Sunday, October 9, 2011

Halloween mural - scary fun!

Click to enlarge
 

   Halloween has always been one of my favorite days of the year. I decided to have a party, but it had to be one to remember, a party which came from my heart and soul. So, I gathered all my painting tools and artist brushes and lost myself in my ghoulish thoughts for a few days. The actual size of the mural was 8ft x 16ft.
   
   
My family thought I had lost my mind. They could not believe that I was painting this huge mural on our family room wall. Hey! I'm a painter and all I need is a little primer and paint, don't worry!

     As the hours passed my family shaking their heads as they walked by, I continued painting in somewhat of a trance, until it was complete. I stepped back to look at my work and said to myself, I have lost my mind just in time for the party.
      The party turned out to be a big hit. Everyone took pictures standing in front of this fun, haunting backdrop and laughed that I would do such a thing. I did a lot more to my home to keep in the theme but the mural was my favorite.


Have a vision for adding something ghoulish for your Halloween party? Don't be afraid, loose yourself. Get into the theme of things. All it takes is a little paint and imagination.

Sunday, October 2, 2011

Drywall repair


click on photo's to enlarge
  Drywall repair

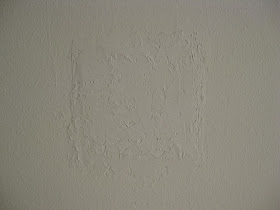
As you can see there is a wall repair which has to much texture and it does not match the surrounding area.  Let's see what else we will find.
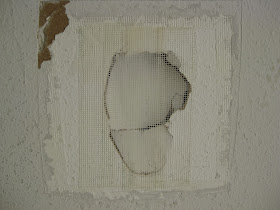
 Surprise! After cutting the outer area with a razor knife, there was a thin metal patch which was used to cover the hole. I will use mesh tape for this application and you will see why in the next photo's.

 Mesh tape was applied over the hole and on to the surrounding area for support. The mesh tape has an adhesive on it's surface and it makes it easy for it to stick to the wall.  I applied a few more strips in the center for more support.

Note: I used 20 min. compound mix for this project. If there is no time restraint you can use basic drywall compound. Apply small amount of compound. It's amazing how little goes a long way.
 This is the first application with 20 minute compound using a 4 in. compound blade. I applied a small amount to the area and lightly onto the mesh tape, over the hole. What I like about this application is the tape can be slightly pushed in to give you a concave area. This will keep you from over applying the compound like the first picture. The main thing here, don't over apply the compound on the mesh tape, keep it close. Try not to fill the hole in one shot. Let this completely dry.
Another coat of of compound was applied with a 6 in blade. Build up the hole so that it is level with the surrounding area. It may take another coat to get everything level. When the compound fully dries and you are satisfied go ahead and sand the area with 150 grit sandpaper.
I like to sand  the outer sides to feather them into the surrounding area, and then into the center.  Wipe the area clean with a damp cloth, when dry apply a water base primer with a 4 in. roller and a 1/2 in. nap.

In this final photo I applied the orange peal texture from a spray can. Try not to cover the area in one shot. Take a moment to see if you need more and apply again. To remove the excess, use a damp sponge before it dries. Spray slightly onto the outer areas of the patch going on the original wall texture, but be careful not to over do it. When texture is dry I applied a water base primer and when it dried, I applied latex finish coats with a 4 in roller 1/2 nap.

NOTE: Practice spraying the texture onto a piece of drywall or board before applying it to the wall. Most of these spray cans have a dial at the tip which enables you to increase or decrease the amount of coverage. Cover the floor, furniture and window treatments before spraying the texture. Protect your eyes and ware a dust mask. Follow all manufactures instructions. Take your time and have fun! If have any questions please -
Call 772-879-9678 or e-mail us at arrayofcolorinc@yahoo.com


Saturday, October 1, 2011

Enjoy your morning coffee...


For most of us, one of the first things we do in the morning is to enjoy a delicious cup of hot coffee, made just the way we like it. With each sip, euphoria slips away and we become aware of the day ahead. Can it be possible to have a work day as good as this coffee? Reality sets in and you would be happy if only a few small things were to go wrong. Here’s a story of a not so perfect day.

One morning a painting contractor gave out the work orders for the day to the employees. One of the projects was a simple one, prime and paint the interior walls of this small home. The boss received a call a few hours later saying they needed more primer. Why do you need more primer? The boss asked. The mural on the wall will not cover and we used most of the primer on just that, replied the employee. What! You painted over the mural, you were not asked to do that, said the boss in a frustrated tone.

Well, it was too late. The mural, which was painted by a local artist, was completely covered with primer. The cost to repaint the mural was about even with the cost of the paint project. At first the homeowner flipped out but soon realized that the original artist could reproduce the art work. The home owner and the artist were the winners that day, the artist has several days of work and the homeowner gets her custom mural repainted.  So, let’s take another sip of coffee and reflect on our day, which was not that bad after all.

Just about every day I visit the paint supply center to pick up my paint order and misc. items. I hear all these amazing stories. Contractors, customers and the employees share their tales and experiences, some sad, some funny and some inspiring. Have any stories to share? Add them in the comment box. I look forward to reading them.

Thursday, September 29, 2011

Strange way of getting work


                                                      Strange way of getting work

I have seen many strange things happen in my painting profession over the years, but this story I have to share. It is one of the craziest to date.

My customers sat down to a great fish dinner at home and decided to go to the movies when they were finished eating. Meanwhile, the smell from this delicious meal was going much further than the kitchen. While they were out a raccoon entered their guest bedroom window by tearing away the screen and jumping on the furniture. Their dog was startled from the noise and ran into the room to see who or what was there. As soon as they met, all hell broke loose.

The raccoon ran across the house and into the den trying to get away from the dog, who at this point,     was foaming from the mouth. The raccoon tore the window treatments from the wall and tossed the furniture while trying to escape. Finally the raccoon jumped through the window screen and disappeared.

The dog was not harmed and I think he did a great job protecting his home. The homeowners could not believe that the break in was not from a burglar.  It did not take long to see that it was a raccoon with its claw marks left across the walls and pieces of fur on the floor. I guess I have to thank my customers, and the raccoon, for the job. Are raccoons part of the economic stimulus package?

If you have any strange stories how you received a project in your profession, please add it in the comment box. Thanks!


Saturday, September 24, 2011

How to - Rag technique

click to enlarge


How to - Rag technique


     This is one of many ways to use a rag for faux techniques and one that is easy and looks great! For this project you will need a quart of glaze ( water base ) and a quart of Sherwin Williams #6773 latex eggshell finish. The faux walls were base coated with a Sherwin Williams HGTV # 6478 eggshell finish and ragged with SW 6773 also eggshell finish. Tape off all areas not to be painted. If you have a steady hand there is no need for taping the ceiling.

       Mix one part glaze with one part paint. Apply mixture to a damp rag just enough to lightly coat. Apply mixed glaze onto the wall with a brush in a triangular pattern and move the glaze around with your rag. Leave some areas open.
     
       A clean damp rag was used to remove some of the glaze to create open areas and a random pattern.The folds in the rag will leave interesting marks by moving your hand at various levels of a clock. 

     Work the glaze as if you were building a puzzle. No straight lines. When your close to the corners move your glazed rag into the corners sparingly ( Don't fill the corners with excess glaze) Skip spots in corners to keep a random look.


     Note: Apply glaze to your rag at the beginning. Rinse the rag slightly when it gets loaded with glaze. The second rag should be damp and kept clean so you can remove excess glaze and apply pattern. Turn your hand randomly to keep from applying the same pattern.
      
     If this is your first attempt with this technique it would be best if you practiced on a piece of construction board. Enjoy your finished faux walls.


Friday, September 23, 2011

Pieces of time


Let's face it, without realizing why we do the things we do,
we tend to surround ourselves with great memories, pieces of time that bring us back instantly over and over. Some of us are able to take our possessions to create these moments.


 Leslie R. is very creative and has a great outlook on life, it shows in her decor. The guest bath has a faux rag technique with blue green glazes which mimics sea water. The towel rack has starfish hung on sisal string against the hand towels. The ceramic fish tissue holder adds to the fun. Key West here I come.


We all need a place to escape, relax and have peace. Leslie loves the beach and this room shows it with all the accent pieces. This room has a lot of light, it is airy, colorful and fun. This is for the guests and Leslie wants them to enjoy being there. 


The faux walls were base coated with a Sherwin Williams HGTV # 6478 eggshell finish and ragged with SW 6773 also eggshell finish. I applied the glaze in a triangular pattern and moved the glaze around with a damp rag leaving some base areas open. A clean damp rag was used to remove some of the glaze to create open areas and a random pattern.The folds in the rag will leave interesting marks by moving your hand at various levels of a clock. Work the glaze as if you were building a puzzle. No straight lines.

Note: Apply glaze to your rag at the beginning. Rinse the rag slightly when it gets loaded with glaze.
The second rag should be kept clean so you can remove excess glaze and apply a pattern. Turn your hand randomly to keep from applying the same pattern.

If you would like to create your own escape contact us at arrayofcolorinc@yahoo.com


LOOK UP!!!


      LOOK UP!! What do you see in your own home? Probably a white ceiling, we       call it the forgotten wall. If you would like to add a WOW factor into your living area, try adding       some  color to your ceilings. Step out of the box and try something new. If you have difficulty             deciding on a color, you could use the same color that is on your walls. More and more, clients are      adding color on their ceilings, especially when I offer to repaint them at no charge. Sometimes            they need a little push, it usually takes a week to live with and become comfortable with, but the         results are an overwhelming  success.                                                                                                      

Monday, September 19, 2011

In deep water


There have been many occasions when I was asked to redo a paint project. It was not due to poor work or failing products, it was from WATER, a lot of WATER.

 I completed an interior paint project for a retired couple’s vacation home. They were very excited and anxious to head back to their home up north for the holidays and show the picture’s of their new interior.

While my clients were up north, a neighbor walking their dog noticed water coming from under their front door. The neighbor called my client, who then gave him direction to get into the home. As soon as the front door was opened, a rush of water pushed its way out onto the front lawn.  Once inside they could not believe their eyes. Since the water was in the house for an extended period of time, it developed the greenest growth of mildew they had ever seen. It looked like there was grass growing on the walls. The water was finally shut off and they found a crack in the toilet tank which caused water to continuously escape. The neighbor called in a local company to begin the clean up and restoration process.

About four weeks later, I received a call asking me to come back to their home to repaint the interior.  In total confusion, I asked “why?”  They told me there was major water damage in the home and almost everything had been ruined.

When everything was replaced, I returned to paint the interior again. Once again, they were very happy with the painting and relieved the whole ordeal was over. This time they made sure the main water valve was shut off and the toilets tanks were empty before their trip back north.

Regardless of whether your trip is long or short, I strongly suggest shutting off the main water valve into your house before you leave.


Friday, September 16, 2011

Welcome Back!


Mary H. was very excited to return to Florida for the summer season. Relaxing and taking walks on the beach was top on her list. Mary arrived in her new condo and noticed an enormous amount of water had entered the house. The neighbor above  had a water leak and it made it's way into her unit.

Mary contacted my painting company and we made arrangements to meet. Upon inspection there were two bathrooms and a closet which had large water stains on the ceilings and some near the base boards. The linen closet had stains on the ceiling and down the wall. The base in the master bath was completely removed and there was a nice size hole in the drywall.

Mary was very upset. In my profession, I had seen much worse and thought that it was an inexpensive project. There were a couple of other people who gave an estimate for this project and Mary was hoping that my estimate would be more realistic. This would not take us long to complete, so it only took a minute to give her a price. Mary was so happy with the estimate she asked for another to paint the entire condo interior. Well, Mary made my day! We set up a start date to do all the repairs and interior painting. The project was completed in the time we originally stated and Mary’s home looks great!

Well, occasionally BIG things do come in small packages. It was a 40 mile trip to her house and it was worth the time and the gas. It gets better! Every day on the job Mary had food and drink, donuts in the morning with hot coffee and big lunches. I thought we were in paint heaven. Once we had completed the paint project we were hanging new curtain rods, and showing our gratitude for all the hospitality. Mary was just so happy to have her home looking better than ever. If you’re happy we are happy!

Monday, September 12, 2011


Life on a Ladder

Welcome to Life on a Ladder. This is an introduction of my twenty plus years working as a painter and business owner. You will find photos of my work, tips, and my clients will share some of their experiences.There will be amble supply of information on how to do the vast amount of painting projects to decorate your home or business.

I have spent over twenty years up and down ladders; most people are probably thinking “so what!”  Well, first the ladder is an essential tool for my occupation. My projects could not be completed without it. As a painter, I have come to recognize that the ladder also represents the never ending experiences of the socio - economic environments.

My ladder has given me a different perspective on life and my customer’s lives. At the top of the ladder I have seen majestic sail boats cruising across the calm sea and the tops of palm trees swaying with the wind; in addition, watching jet skiers fly in the air after hitting a wave, while I have both hands on the ladder holding firm standing about three stories high. Subsequently, there is the low end of the ladder, where we have worked in numerous foreclosed homes and short sales. Unfortunately, many of these homes were abandoned so quickly that personal items and kid’s toys were left behind, only to be thrown away to make way for a new family or investor. This has been very difficult for many of my fellow painters and me, we realize that this could be us. I can only hope that these people can find a remedy for their dilemma.This is just a glance at the diverse situations that we face every day.


As you can see my occupation is much deeper than just painting.
I have made lasting friendships throughout the years which has helped me threw some hard times. I hope I can inspire you to improve your life and your space.

Friday, September 9, 2011

Repair Tips - Torn Drywall

 Repair tip no. 1 - Repair torn drywall
As you can see there is a very long tear running across the base of the wall. This happens when the base boards are removed without scoring the tops of the base were it meets the wall. You can save yourself a lot of work by running a razor blade along the  top of the base lightly cutting into the paint and caulk. When you remove the base you will have minimal damage. Supplies needed for repair: Razor knife, 6" metal compound blade, 150 grit sandpaper or block, drywall compound, oil primer, latex primer, Paint brushes, rags, paint and don't forget patience.


Before you apply the oil base primer cut the loose pieces of  drywall with your razor knife.
The brown paper will need to be primed to keep it from bubbling once the compound is applied.
Let the oil base primer dry. Now lightly sand  the raised areas using the 150 grit paper or block and cut away any paper which my be sticking out.  


Apply compound with a 6" blade ( 4" if the area is smaller ) Do not try to cover the area in one shot. Let the first coat dry and lightly sand as needed with 150 grit paper or block. Take a damp cloth to wipe off any dust on the repair area. You can use your blade to knock off and particles that are raised on the  repair area. Apply the next coat of compound after the first is thoroughly dried. Do not apply too much compound to the wall.Bring your blade slightly higher than the tare line.


Once the second coat is dry its time to sand the
area with 150 grit paper or block. I start at the top or outer section and work my way into the center. Be careful not to sand so deep into your work. The repair is  very thin and will not need excessive sanding. Wipe off the dust with your damp rag and take a look to see if you need another coat of compound. You may need just a touch up or two. If you are pleased, apply your water based primer. Once dry apply your finish coats. If you see anything that you don't like after you paint, you can apply compound to the  spots and repeat  the above. Good luck and have Fun !

NOTE :  Please follow label instructions for all products used and how to discard any waste.


Sunday, September 4, 2011

It's amazing !

It's amazing what you can do with paint ! Today you can easily find a multitude of  information, products, and "how to" instructions on various paint techniques. More and more people are turning on their own creativity. They are heading out to there local stores to purchase all the needed supplies. You run home excited to begin your project and share the results with friends and family only to realize the task ahead. You need to move the furniture, put the dining room chairs in another room, take the pictures off the wall, take down the curtains and rods, cover all the floors, and remove the valuables from the curio cabinet. It takes time to create your Picasso.  From my experience, many customers take on this task and become discouraged.  Many of my clients have put themselves in this situation and we finish the projects for them. Don't get discouraged, plan your project, ask for help if you need it, and most of all have FUN.

If you would like professional help contact me by at - arrayofcolorinc@yahoo.com
Like Us on Facebook
Follow us on Twitter

Wednesday, August 31, 2011

Color affects our life

Color affects our life in so many ways, the cloths we buy the cars we drive and the furniture in our homes are decided by color and how that certain color affects you.
Color greatly affects our purchasing of food and drink.
The photo on the left shows a kitchen with a red
accent wall, why? The red wall adds warmth and it invites conversation and appetite. Red is also
daring and passionate.
Many fine restaurants have painted walls of red or red accents.

What drives us to choose the colors in our lives?  Check out this link for more info on how color affect us.....   http://www.pantone.com/pages/pantone/Pantone.aspx?pg=19382&ca=29