The amazing things you can acheive with paint !
Join me for an inside view of a painters world, a world filled with people, places, color and design. My painting company is a perfect platform to show you all the amazing things you can achieve with paint. There will be photo's, stories and DIY tips. From time to time I will throw in some of my art work.
Array of color inc specializes in interior, exterior painting and faux finishes. Our services areas are Indian River Cnty, St. Lucie, Martin and Palm Beach Counties. Call for a free estimate - 772-528-6365
Sunday, March 3, 2013
Distressed faux block wall
Here is an example of a distressed faux block wall where the outer wall area looks broken away exposing the concrete blocks. A rag technique was used over a light texture of dried compound to achieve this look. The glaze was built up around the cracked perimeter randomly to give depth to the blocks.
We used several glazes from the same color family with the base coat being the lightest.
Eggshell sheen latex was used for the base coats and glazes. Textured surfaces are great to work with while glazing, the glaze falls into the texture and produces great affects.
To see how to create the faux concrete blocks visit the attached link
http://arrayofcolorinc.blogspot.com/2013/03/faux-finish-concrete-block.html
Wavy Diagonal Stripes
Wavy diagonal stripes add a little whimsey to a room and adds character. This is a hand painted design that's easy and fun. We chose the two walls by the day beds as a focal point. Three colors were used for this rag technique. First apply the base coat in an eggshell finish, I suggest two coats for the base, which is a med tone color.
Once the base is dry apply the first glaze which is lightest color. The next glaze is the darker color. Choose colors which are in the same family and are a few shades darker from one another, so you have some contrast.
The glaze formula for both colors are 1 part paint to 1 part glaze. Once the base coat has dried the first glaze is applied with a soft rag. The rag is painted with glaze and transferred to the walls using a 45 degree angle. TIP: Put a small amount of glaze into a paint tray and brush the glaze onto both sides of the rag.
Rap the painted rag around your fingers and draw the design on the wall producing a wavy pattern. Wear gloves so your hands stay clean from any paint. Apply the second glaze the same way but run the glaze in and out of the last glaze pattern. While the glaze is wet on the wall removing excess glaze is easy. Try to keep the pattern random. The diagonal stripes look best when there are various shades of a color popping up randomly. TIP: Try not to have a solid stripe, remove glaze in some spots and leave straight glaze in others. This will produce an interesting pattern.
Remember to cover the floor with painters tarps and tape off the wood work. This is a free style
form of painting that can be a lot of fun. This technique will find the artist in you, enjoy!
Saturday, March 2, 2013
Coffered Ceiling Faux Painted
Coffered ceilings add a unique and elegant look to any room. Here is an example of how this type of ceiling can be decorated with paint. The ceiling panels were sponge painted with a subtle warm glaze and the crown moldings were fauxed to a warm mahogany with a satin finish. The soft off white painted beams have a great contrast with its neighboring colors making this ceiling pop.
Labels:
Coffered ceiling,
crown molding,
faux wood,
glaze,
sponge painted,
sponge technique,
warm mahogany faux
Friday, March 1, 2013
Faux concrete block
Faux concrete block
This faux technique is very versatile, it can be used in many decors, colors and dimensions.
The faux blocks were designed to be distressed for this project, but can be made to fit your imagination.
Be prepared to do a lot of work to complete this project, but the rewards are gratifying. Up to two people to complete this project and various skills are required.
Start with several colors which are in the same family, in this case we used earth tones. The base will be a light color and the blocks will be glazed with the darker colors. The blocks in this photo were 6 x 12 in. The wall was mapped out using a 4 ft level. Each block was taped off with 1 in. blue tape, then the entire wall was skim coated with compound. A slight texture was given to the wall using a compound blade and more compound. Once the compound dried the tape was removed and the wall was primed. The wall was then painted with a coat of eggshell finish with the lighter color.
Note: When removing the tape the block edges will be chipped. This is good if your looking for a distressed look. If you would like a smooth edge to the blocks the tape will have to be removed before the compound dies.
After the base coat is fully dried the first glaze ( med. color ) is applied with a sea sponge. Use the sea sponge as if your washing the wall. The second glaze ( darker color ) will be used randomly and also applied with a sea sponge. The glaze mixture is 1 part glaze to 1 part paint. Let the glaze fall into the texture to create character for each block. Keep the blocks from becoming the same color, mix them up. If you find that a few blocks are to much the same repaint the base coat in that area and re-glaze.
We added a warmer glaze randomly to keep it interesting. Finally, the grout lines were re-painted with the base color using a small brush. I recommend using a practice board to apply the compound to create a texture that your satisfied with before applying it to your walls. Enjoy!
See more you can do with this project at this link
http://arrayofcolorinc.blogspot.com/2013/03/distressed-faux-block-wall.html
This faux technique is very versatile, it can be used in many decors, colors and dimensions.
The faux blocks were designed to be distressed for this project, but can be made to fit your imagination.
Be prepared to do a lot of work to complete this project, but the rewards are gratifying. Up to two people to complete this project and various skills are required.
Start with several colors which are in the same family, in this case we used earth tones. The base will be a light color and the blocks will be glazed with the darker colors. The blocks in this photo were 6 x 12 in. The wall was mapped out using a 4 ft level. Each block was taped off with 1 in. blue tape, then the entire wall was skim coated with compound. A slight texture was given to the wall using a compound blade and more compound. Once the compound dried the tape was removed and the wall was primed. The wall was then painted with a coat of eggshell finish with the lighter color.
Note: When removing the tape the block edges will be chipped. This is good if your looking for a distressed look. If you would like a smooth edge to the blocks the tape will have to be removed before the compound dies.
After the base coat is fully dried the first glaze ( med. color ) is applied with a sea sponge. Use the sea sponge as if your washing the wall. The second glaze ( darker color ) will be used randomly and also applied with a sea sponge. The glaze mixture is 1 part glaze to 1 part paint. Let the glaze fall into the texture to create character for each block. Keep the blocks from becoming the same color, mix them up. If you find that a few blocks are to much the same repaint the base coat in that area and re-glaze.
We added a warmer glaze randomly to keep it interesting. Finally, the grout lines were re-painted with the base color using a small brush. I recommend using a practice board to apply the compound to create a texture that your satisfied with before applying it to your walls. Enjoy!
See more you can do with this project at this link
http://arrayofcolorinc.blogspot.com/2013/03/distressed-faux-block-wall.html
Labels:
blue tape,
compound,
distressed,
faux blocks,
faux concrete block,
faux technique,
glaze,
sea sponge,
texture
Sunday, February 24, 2013
Painted Stripes
Painted stripes using a flat and a satin finish create an elegant look for a dining room or a focal area. The satin sheen stripes capture the light and reflect a beautiful soft glow. For those of us who have 8 ft. ceilings this is a great way to create an illusion of height to the room.
Prep your area first, cover floors, remove pictures, move furniture, repair walls if necessary.
Apply two coats of flat latex paint in the color of your choice. Use a good quality paint.
Once the paint is fully dried measure out the stripes, in this case they were 4 in. wide. I use a 4 ft. level to lightly pencil in lines for the tape. Tape off your lines on both sides of the each stripe. Every other stripe will be taped. Use a low tack tape so the paint does not get pulled off the wall when removing. Use a 1 1/2 in. wide tape.
When the taping is completed apply a clear satin urethane to all the bare stripes using a brush to cut in top and bottom and then a small roller. The roller cover should be lint free and a 1/4 in. nap. Apply a small even amount to the roller and gently roll on the wall, a second coat may be required. Remove excess urethane so it does not drip all over when rolling. Let this finish completely dry and then remove your tape being very careful not pull up your work.
This is a great weekend project which may require two people with a supply of patience. Measuring and taping use up most of the time, the painting goes rather quick. Have fun!
Prep your area first, cover floors, remove pictures, move furniture, repair walls if necessary.
Apply two coats of flat latex paint in the color of your choice. Use a good quality paint.
Once the paint is fully dried measure out the stripes, in this case they were 4 in. wide. I use a 4 ft. level to lightly pencil in lines for the tape. Tape off your lines on both sides of the each stripe. Every other stripe will be taped. Use a low tack tape so the paint does not get pulled off the wall when removing. Use a 1 1/2 in. wide tape.
When the taping is completed apply a clear satin urethane to all the bare stripes using a brush to cut in top and bottom and then a small roller. The roller cover should be lint free and a 1/4 in. nap. Apply a small even amount to the roller and gently roll on the wall, a second coat may be required. Remove excess urethane so it does not drip all over when rolling. Let this finish completely dry and then remove your tape being very careful not pull up your work.
This is a great weekend project which may require two people with a supply of patience. Measuring and taping use up most of the time, the painting goes rather quick. Have fun!
Labels:
focal area,
lint free roller,
low tack tape,
painted stripes,
satin urethane. create height,
taping,
weekend project
Sunday, February 17, 2013
Tips for Painting Cabinets
Lets face it we all make a mistake at one time or another but it would be great if we caught them as we were doing it.
Here are a few examples of over-sites which could be avoided.
In this photo too much paint was applied either by roller or brush. Applying to much pressure to the roller would also cause this. To correct this if its still wet is to blend in the paint with a brush or roller. If it dried then carefully sanding with 220 grit should work. 150 grit if you need to be more aggressive. In some cases the sanding may lift the area and spackle may be used to smooth out the damage.
Again, too much paint on the brush. Catch this when wet and it should not be a problem. Use a drier brush and lift the excess out then blend.
When painting wood apply the paint either by brush or roller in the direction of the wood grain.
Don't be tempted to cover the area in one coat.
On cabinets thin coats will produce a beautiful finish.
These ropes will appear when the pressure on the roller is uneven. Roll over if wet and blend in. If dry, sand lightly and skim coat with spackle to cover.
Note: Latex paint does not sand well, so avoid these paint ropes. Oil base sands well but try to avoid the extra work.
Important: When sanding lead dust may enter the air which causes many health problems. Check first for lead before starting your project. Read all product labels.
If you would like to see more on painting kitchen cabinets visit my link -
http://arrayofcolorinc.blogspot.com/2013/02/paint-kitchen-cabinets_17.html
Here are a few examples of over-sites which could be avoided.
In this photo too much paint was applied either by roller or brush. Applying to much pressure to the roller would also cause this. To correct this if its still wet is to blend in the paint with a brush or roller. If it dried then carefully sanding with 220 grit should work. 150 grit if you need to be more aggressive. In some cases the sanding may lift the area and spackle may be used to smooth out the damage.
Again, too much paint on the brush. Catch this when wet and it should not be a problem. Use a drier brush and lift the excess out then blend.
When painting wood apply the paint either by brush or roller in the direction of the wood grain.
Don't be tempted to cover the area in one coat.
On cabinets thin coats will produce a beautiful finish.
These ropes will appear when the pressure on the roller is uneven. Roll over if wet and blend in. If dry, sand lightly and skim coat with spackle to cover.
Note: Latex paint does not sand well, so avoid these paint ropes. Oil base sands well but try to avoid the extra work.
Important: When sanding lead dust may enter the air which causes many health problems. Check first for lead before starting your project. Read all product labels.
If you would like to see more on painting kitchen cabinets visit my link -
http://arrayofcolorinc.blogspot.com/2013/02/paint-kitchen-cabinets_17.html
Paint Kitchen Cabinets
Update your kitchen cabinets with some paint, patience and of coarse knowledge. Would you like to have these beautiful, dark, rich painted cabinets?
Well, you can! Follow the system I use and your on your way to having a professional look to your cabinets.
The photo to your left shows wood cabinets which where completely painted and new stainless door pulls were added. The color of the finish is almost black, like espresso. Here is a supply list of items which will be needed to complete your project. Clean rags - lint free, ammonia, plastic bucket, 1/4 in. nap mohair mini roller cover and roller, these rollers come in a package of two,
2 in. Chinex paint brush, 1 1/2in. Blue tape, vinyl spackle, small spackle blade, clean tarps to lay the doors on, 1 qt. of Benjamen Moore Advanced water borne alkyd paint, in the color of your choice, 1 qt. Stix water borne bonding primer tinted to the color of your choice or a med. to dark grey like the one shown below. A drill will be needed to remove all hardware. 220 and 400 grit sandpaper, vacuum and a dust mask.You may want to purchase de-glossing liquid ( instead of sanding ) ask your local paint supplier what product would be best for this situation.
Note: I used a SATIN finish for this project.
This step may have to be done several times.
Dry off cabinets and your ready for the next step.
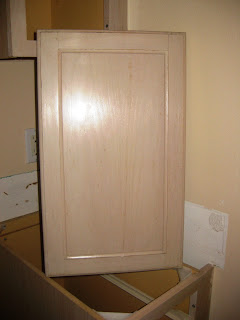
The photo on your left shows the original wood cabinet door.
This is a washed oak look and is begging for a change.
Put on your dust mask.
Take the 220 sandpaper and sand all areas to be painted.
Sand in the direction of wood grain. They sell de-glossing
liquid which will remove the original sheen and make
for a better surface to paint, if the sanding is to difficult.
When sanding is completed wipe down all areas
and vacuum any remaining particles.
If your changing the door and draw pulls fill all
holes with the vinyl spackle, let dry, sand smooth and wipe of any dust or vacuum.
Now your ready to apply the primer. Dip your brush into the primer ( mentioned above ) and paint into and along the stiles and rails of the back of the doors. Only a thin coat of primer is needed. Also we would like to keep any buildup of paint from getting in the corners, so pay attention to that.
When applying either primer or paint your brush strokes must be in the direction of the grain.
The only time that the stroke will be against the grain is when your brushing along the top and bottom of the rails. As long as there is a thin amount of paint applied to these areas there should be no cause for alarm.
While rolling, have an even pressure and roll from the top to the bottom to achieve a smooth finish. These rollers can hold a lot of paint so be careful. Check often to see if there is any excess of primer on the sides which needs to be blended in.
At this point we are concentrating on the backside of the doors. Let primer dry completely.
OK! your doors are completed on the backside and now the fronts are ready. Follow the same steps for the back.
While your waiting for the doors and draw faces to dry start priming the wall cabinets and the bases. Tape of any areas where you'll need to keep the paint off.
Use the 1 1/2 in. Blue tape. The wall cabinets and base cabinets will be cut in and rolled using the same rolling technique. The frames will also cut in and rolled as needed.
Now your ready to apply the top coat. Once again apply the paint with a Chinex brush and lightly paint the back of the doors as shown on the left. Apply a small even amount of paint along the sides of the stiles and rails. Then fill in that section with your mini roller going with the grain. Your roller should not be overloaded at any time.
Keep your strokes even with slight pressure.
Move with the grain. When the panel is completed move to the rails and stiles watching for any excess which flows over the sides.
Check for any dust which may of dried on the paint finish and sand off lightly with the 400 grit sandpaper. Wipe clean and apply another coat.
Two coats will be necessary to cover.
TIP- Try not to cover the project with one coat.Thin coats will produce a beautiful finish.
Visit my link which will show more tips which will help with your project
http://arrayofcolorinc.blogspot.com/2013/02/tips-for-painting-cabinets.html
Visit my link which will show more tips which will help with your project
http://arrayofcolorinc.blogspot.com/2013/02/tips-for-painting-cabinets.html
Here is a photo of the bottom side which I had painted and the top of the door on the hinged side. Later when both sides are dry I will hang the doors back on the cabinets and then finish painting the sides.
Once all coats have dried your ready to put the hardware back on and replace all the doors and draws.
Remember to read all product information on the label and be aware that sanding may emit lead dust in the air which is known to cause many health problems. Keep the work area ventilated properly. Keep safe.
Subscribe to:
Posts (Atom)
.jpg)
